Added the function of inserting and removing the filament.
In addition, a convenient function for nozzle cleaning was also added.
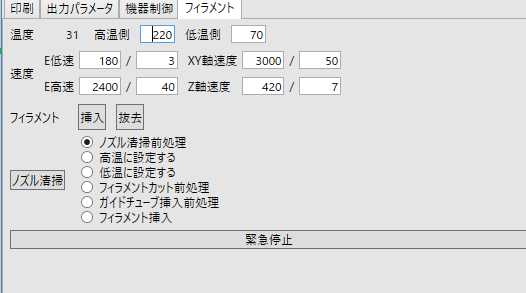
Summary of added features.
The filament replacement from the console screen of the Adventurer 3 was so slow and I wondered what it was like, so I was considering whether it could be done with the program.
Well, if the nozzle temperature is low, don’t slam the filament at high speed, but I understand that it is the specification that I waved to the safe side.
Filament insertion
Run with the filament hooked to the feed wheel.
After execution, the filament is immediately inserted up to the joint of the guide tube. Thereafter, when the temperature of the nozzle reaches the high temperature side, the filament is inserted slowly, and when the filament is pushed out of the nozzle, the emergency stop button is pressed to stop the processing.
Since the distance to the tip of the guide tube was about 47 cm at the time of high-speed insertion, the distance of 46 cm, which is 1 cm before that, is inserted in the program.
Since the length of the guide tube may be shortened depending on the production lot, it is better to remove the guide tube in advance and make sure that the filament does not protrude from the guide tube during high-speed insertion. It may be good.
If the guide tube seems to be short, change the value of TubeLength in the following file.
%APPDATA%take4-bluePrintControlerFilamentLoad.json
Filament removal
Make the temperature of the nozzle high, push the filament a little and then pull it out at high speed.
The amount to be pulled out is about 1.5 times the TubeLength used for feeding, so I think it will probably stop naturally if pulled out.
Nozzle cleaning
Until now, in order to clean the nozzle, the nozzle was removed from the head.
In the cleaning YouTube video from FlashForge, it seemed like it was not necessary to remove the nozzle from the head in particular, so I added a command to help the operation.
Auxiliary commands are four types in all.
Most of the operations are as shown on the page of the Adventurer3 controller, and it seems that the nozzle cleaning has become a little easier with this command.
Finally
Once, the program itself has completed the implementation of the functions originally planned. I wonder if it took me a lot. Also, since it was the first time a decent C #, WPF program, I studied a lot.
As for the leftover, the Brim length adjustment of the G code file output by Simplify 3D, or it corresponds to the fact that it is being retracted even though nothing is output.
コメント