
A program that controls Adventurer 3 instead of FlashPrint.
Source Code

- Functional overview
- Automatic detection of machine
- Device status display
- Output
- File correction function
- Remove comment lines(Simplify3D/Slic3r)
- Add start / end code(Simplify3D/Slic3r)
- Add play removal command(FlashPrint/Simplify3D/Slic3r)
- Add Lift offset (FlashPrint / Simplify3D / Slic3r:Ver1.5)
- Correction of Brim output contents(Simplify3D)
- Global Offset(FlashPrint/Simplify3D/Slic3r)
- Elimination of unnecessary retraction(Simplify3D/Slic3r:V1.3)
- Filament replacement(V1.2)
- Nozzle movement(V1.1)
- For Slic3r(V1.4)
- Prerequisites for using Simplify3D
- Prerequisites for using Slic3r
- starting method
- screen structure
- Installation
- Download / Update history
Functional overview
Automatic detection of machine
Automatically detects Adventurer3 connected via wireless LAN and displays IP.
If automatic detection is not possible or if multiple Advertisers 3 are connected to the LAN, connection can be started by specifying the IP address.
Device status display
Display nozzle temperature, bed temperature and equipment status.
At the time of printing, you can check the progress of printing and the image from the camera of the device.
Output
Send the file output by FlashPrint, Simplify3D, Slic3r to Adventurer3 and start printing. If necessary, correct the content of the output file and output it.
File correction function
Remove comment lines(Simplify3D/Slic3r)
Remove comment lines beginning with ‘;’ in the file. Performs processing equivalent to ‘{STRIP”; “}’ described in Simplify3D script-additional terminal command for post processing.
Add start / end code(Simplify3D/Slic3r)
Add G code to the output file so that printing can be started / stopped by Adventurer3. At that time, it was also possible to add a control code for chassis fan control and stepping motor voltage that could be set on the FlashPrint side.
Add play removal command(FlashPrint/Simplify3D/Slic3r)
When moving on the Z axis, add a command to move to the specified position after raising it once.
At Adventurer3, the Z-axis positioning gear seems to have some play, and when moving the nozzle from the bottom to the top, the amount of upward movement is absorbed by the mechanical play, and the height is correct. Use when not.
Add Lift offset (FlashPrint / Simplify3D / Slic3r:Ver1.5)
When Z rises, the amount of play is offset to the Z value.
A function that was designed to realize non-backlash with a different idea from “addition of play removal command”.
Correction of Brim output contents(Simplify3D)
Simplify3D can not change the discharge parameters for only brims, so change the settings.
The ejection speed can be changed at an absolute speed or at a ratio to the current setting. The discharge amount can be specified in proportion to the current setting content.
Global Offset(FlashPrint/Simplify3D/Slic3r)
Perform a global offset of the coordinate system.
Currently only Z-axis offset is possible.
Elimination of unnecessary retraction(Simplify3D/Slic3r:V1.3)
Find the part that is retracting even though you are not pushing the filament, and remove the retraction cord.
Note that there is no button to turn this feature off.
Filament replacement(V1.2)
Two functions of insertion and removal of filament are used to make it an exchange function.
The temperature and moving speed can be defined by parameters.
Filament insertion
It becomes the following operation.
- Send out the filament at a high speed for a specified amount.
- Raise the temperature of the nozzle to the specified temperature.
- Push the filament slowly until the user presses the stop button.
It sends out 46 cm in 1st. This is my machine, set to send the filament to the position of about 1 cm of the tip of the tube.
Note
It may be better to once remove the tube from the header and make sure that no filaments have been seen from the tube in one operation if the delivery length above matches the individual devices. If it’s out, don’t use it for now.
Filament removal
It becomes the following operation.
- Raise the temperature of the nozzle to the specified temperature.
- Slowly push the filament to the specified amount.
- Slowly draw the filament to the specified amount.
- Stop heating the nozzle.
- The filament is drawn at high speed until the user presses the stop button.
Nozzle cleaning
The following four operations can be specified.
Be sure to calibrate in advance when outputting after executing the nozzle cleaning command.
- Nozzle cleaning pretreatment
The filament moving the nozzle to a position where the cleaning tool can be easily inserted is retracted into the tube. - Filament cut pretreatment
Take a little bit of filament out of the tube. - Guide tube insertion pretreatment
Pull in the filament so it can be retracted into the tube Slowly pull the filament out of the filament insertion nozzle. - Set to high temperature
Set the nozzle temperature to the high temperature side. - Set to low temperature
Make the nozzle temperature low.
After performing 1st, the head moves to the following position, and the filament retracts into the tube.
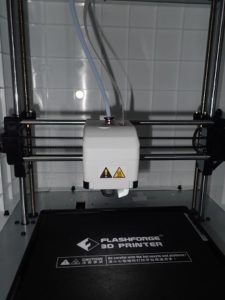
After that, remove the tube from the head, insert a cleaning tool and push the tool many times until the filament does not come out of the nozzle.
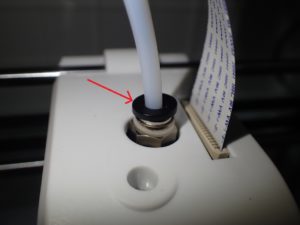
Where the tip of the red arrow pushes in to pull out the tube. Because there is a little force in pulling out the tube and the tube slips, it may be good to do with both hands.
After cleaning, press the 2nd filament cut pretreatment and the filament will come out of the tube, so cut at an appropriate position. Then, when the 3rd guide tube insertion pretreatment is pressed, the filament is drawn into the guide tube, so the tube is inserted into the head here.
Finally, when the 4th filament insertion is checked and the nozzle cleaning is pressed, the nozzle is moved upward, and the operation of ejecting the filament is performed.
Nozzle movement(V1.1)
The position of XYZ and the delivery amount of the filament are controlled by the amount designated by the parameter.
Coordinate values shall be within the following limits.
- X axis
-75 to 80 range - Y axis
-76 to 75 range - Z axis
-0.5 to 154 range
After moving the coordinates, it is thought that there is no blurring of the coordinates because the emergency stop command is issued in a timely manner.
Care should be taken when feeding the filament when the nozzle temperature is low, as it causes knock noise.
For Slic3r(V1.4)
Modify files created with Slic3r so that they can be output to Adventurer3 via the file modification function.
Make the following corrections.
- Z-axis movement speed correction
- Header and footer correction
- Temperature code correction
Prerequisites for using Simplify3D
Firmware Configuration
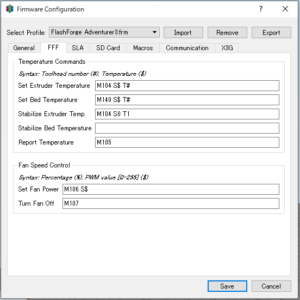
- Stabilize Extruder Temp
M104 S0 T1 - Stabilize Bed Temperature
Blank
FFF Settings-Scripts Tab
The various script fields are blank, and only ‘{EXTENSION” g “}’ is set for additional terminal commands for post processing.
Prerequisites for using Slic3r
Basically, the settings below do not affect the processing.
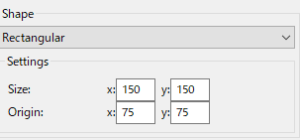
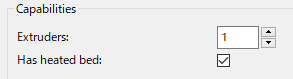
Printer Settings
Set the bedshape to 150 × 150, the origin to 75 × 75, set the number of extruders for capabilities to 1, and turn on the heat bed.
G code Flavor chooses RepRap.

Nothing is set in Custom G-code.
Although 0.4 is added to Extruder 1’s Nozzle diameter, this should be adjusted according to the user’s preference.
Print Settings

For the output file format of Output options, it is more convenient to use the extension “g” because you can drop the output file as it is.
starting method
StartMenu-PrintControler-PrintControler
I didn’t create icons, so it looks like a txt document file.
screen structure
Main Tab
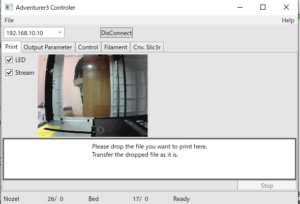
A connectable IP appears in the combo box.
If it is one unit, you can connect to the device by pressing the “Connect” button. After “connect”, the button becomes “disconnect”.
You can release the connection by pressing this button. Note that you can not connect simultaneously with FlashPrint.
You can print the G code file by dragging and dropping the file in the white frame of this screen or the white frame of the file update screen.
Drag & Drop in this white frame, send the dropped file to the device as it is and start printing.
Output Parameter Tab
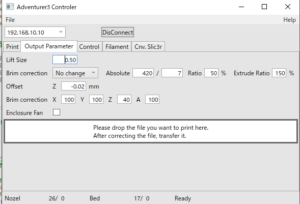
When you switch tabs, you will see a screen where you can set the update parameters for output.
Here, the removal of play and the output control of the brim can be performed.
In addition, the input speed of the left side is mm / min, and the speed of the left side is mm / sec, and the speed of yellowtail part output control is linkable.
Also, if there is an error in the input value, the text input area will be displayed in red.
By dropping the G code file in a white frame, the file is updated with the setting contents and printing is started.
Control Tab
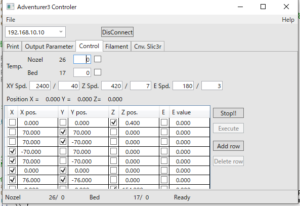
The temperature of the nozzle bed is warmed by entering a numerical value in the text area and turning on the check box. If you want to cancel the setting, turn off the check box.
The movement of the position of the nozzle is moved by selecting the line of the parameter to be moved and pressing “execute”. You can add or delete parameter lines with the button. Since this parameter is stored in the computer, the previous value is displayed at the next startup. As the moving speed, the third parameter from the top is used. Each left side is mm / min, right side is mm / sec.
The movement is selected from X, Y, Z, or E (filament feeding amount). Since the ON / OFF of the check box is the movement of focus first and then the change of ON / OFF, it may be necessary to click twice to make the ON / OFF change.
If there is a problem, press “Emergency Stop” for the time being.
To check the level of the bed
Set the following six parameters for the time being.
- X 0 Y 0
- Z 0.1
- X 70 Y 70
- X 70 Y -70
- X -70 Y -70
- X -70 Y 70
By executing this in order from the top, the nozzle moves to the center and the four corners.
Since it is desirable for the Z axis to be 0.1 mm at each moved point, the gap between the bed and the nozzle is measured, and the bed is leveled based on that.
If this is your first level, if Z is 0.1, the nozzle may drag the bed, so it may be better to start at 0.3.
Filament Tab(V1.2)
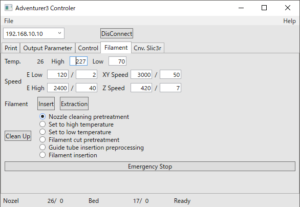
E low speed · E high speed is the delivery amount of filament, respectively, low speed side speed (this is mainly used when there is a filament in the vicinity of the nozzle), high speed speed (this is mainly in Bowden tube when inserting and removing the filament Used to move at high speed)
The XY movement speed and the Z movement speed are used when cleaning the nozzle. When the nozzle cleaning button is pressed, a process is performed in which the check box on the right side is turned on. When the nozzle cleaning button is pressed, the state of the check is displayed in the operation to be performed next.
Insertion of the filament and insertion of the nozzle for cleaning, press the emergency stop button when the filament comes out of the nozzle.
Also, if there is any problem, immediately press the emergency stop button.
This stops all nozzle movement, filament delivery, drawing in and heating to the nozzle.
Cnv. Slic3r Tab(V1.4)
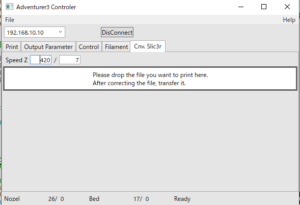
When the tab is switched, a parameter screen for setting the Z-axis movement speed comes out.
Printing is started by dropping the Slic3r file in the white frame below the parameters.
Also, for the dropped file, the parameters set on the file update screen are also applied and sent to the Adventurer3.
Menu
![]()
For now, only File and Help menus.
The file has a menu that allows you to exit the program, and the help has a check box for debugging.
Installation
If already installed, uninstall in advance and perform installation.
Unzip the downloaded compressed file and execute setup.exe.
Download / Update history
Download from
V1.6.1 (2021/09/17)
Supports the transmission method of the new farm version.
MD5
5799959FB634D8E60934498D3E8DFE40
V1.6 (2021/09/11)
Changed the method of searching the IP address of the printer from the method of finding the private MAC address to the same method as FlashPrint.
V1.5(2021/08/25)
Supports non-backlash using Lift offset value.
V1.4(2019-04-05)
Support for Slic3r and bug fixes
MD5
1baf0faf3830b5fb6f66007c4317402d
V1.3(2019-3-12)
Some improvements and bug fixes such as elimination of unnecessary retraction
MD5
e6896332156dd27b3ed193b4316e6dd8
V1.2(2019-3-2)
Adds an auxiliary operation function for filament insertion / removal and nozzle cleaning.
MD5
ec6eb1465bd50b1abe0554f3ecbb0b1d
V1.1.3(2019-2-28)
Bug Fix
- It seems that there is a case that the bed temperature does not rise if the file output by FlashPrint is not output correctly
MD5
c84468aa0927e0efb200d0745c21ccc2
V1.1.2(2019-2-24)
Bug Fix
-
Progress of progress bar is not displayed at the time of file transfer.
-
If transfer is interrupted during file transfer, the connection with the device is lost.
-
If the connection with the device is disconnected while the program is running, the connection can not be made unless the program is started again.
-
If you output a file from the Output Parameters tab, it may occasionally stop.
MD5
67806a5db6e0edc02312057d94b97205
V1.1.1(2019-2-18)
Bug Fix
- If the IP address of the device can not be found, the combo box will be empty, but even if the correct IP address is entered there, the “Connect” button has not been pressed yet.
MD5
5946f5dcbc0381179fb098866286e091
V1.1(2019-02-15)
Implemented control of nozzle position, nozzle and bed temperature.
MD5
42c5c84ec041e89136b77d2704fc256e
V1.0(2019-02-11)
Connection with equipment · Display of equipment status display · Output.
MD5
bd84c1a1d3685b874f79054702993163