On Raspberry Pi, I was able to check if I could control the device and monitor the device on the web.
Actually, I wish I could control the device on the Web, but this time I was learning python, learning Web server (Flask), learning HTML / JavaScript, and so on.
The source is here on Github.
Functional overview
By specifying the IP address of Adventurer3, I connected to that device and enabled it to check the current device status and the photos taken by the built-in camera on the Web.
screen structure
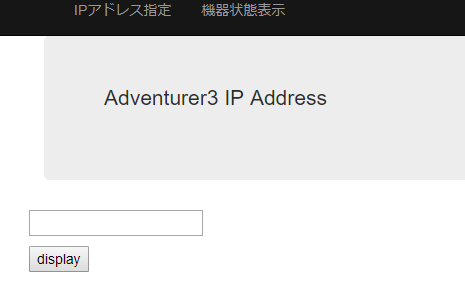
The following screen is for specifying the IP address of Adventurer3 .
Currently there is only Japanese version.
Enter IP in the text box on this screen and press Display to transition to the device status display screen.
The device status display screen is as follows, displaying the current status and image received from the Adventurer3 while updating it in units of 2 seconds.
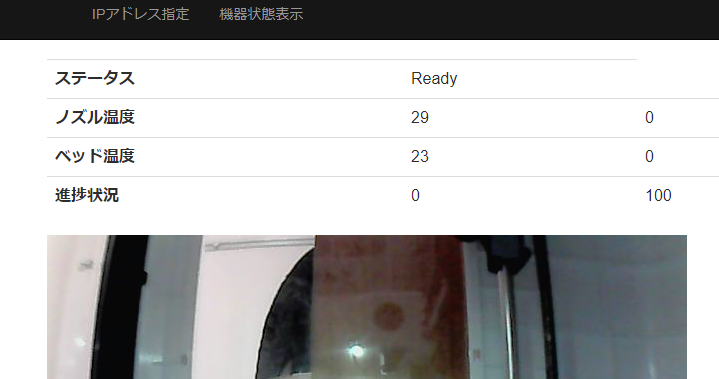
The status currently displayed is the operating status of the device, the temperature of the nozzle and bed, and the progress of the output.
How to start.
Refer to Github’s Readme (Japanese) for more information.
About the program
I use Flask as a web server framework.
The HTML-related material is the same as the one provided when creating a project for Flask in Visual Studio.
To monitor the device, create a thread to call the Controller class created last time, and perform device information and image acquisition.
The status of this device is displayed on the device status display screen, but initially it was implemented by reloading the screen. However, since it was flickering at the time of reloading, I decided that it was a little bad and changed it to a mechanism that only information is acquired with JavaScript and updated.
Since both Python (Flask) and the Web were new to us this time, it took quite a while to find out what we wanted to realize and how to implement it.
Below, a little hard part.
Image delivery
Image reception from Adventurer3 is implemented by controller.py download_image ().
http: // Adventurer3IP: 8080 /? action = snapshot
Since the content of the image type is returned by the above access, the content is held internally, and is returned to the client side in image () of views.py.
However, if received on the client side, <img id = "image" src = "image.jpg" />, once sent, it will be cached on the client side and will not be reloaded.
Therefore, this is also avoided by periodically updating document.getElementById ("image"). Src = "image.jpg? Count =" + new Date (). GetTime ();with JavaScript (Update.js) did.
Status update part
The client side periodically activates getStatus () in Update.js and sends an information acquisition command to the server side.
The server side sends information to the client side in Json format in get_status ().
The client side reflects the contents of the received Json file in the device status display screen.
The next step is
For now, I would like to add a button to stop printing on the device status display screen and control the device from the Web.
コメント